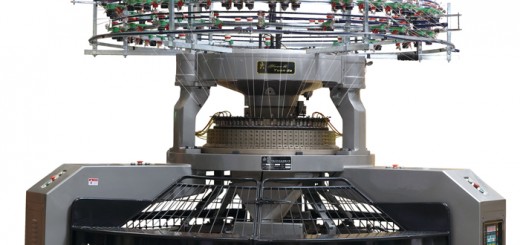
1.The reasons causing circular degree of cylinder failing to the standard
1.1 Wheel chain cannot reach to precision
Locating between disc and chain wheel abrasion causes chain wheel loosening or steel wire runway wearing or loosening. Bearing inside center sleeve of tripod on double circular knitting machine loosens because of abrasion so that circular degree of cylinder cannot reach to the required precision. Methods used to inspection: stop the machine and put header of dial indicator on needle plate bracket. Gauge stand absorbs on parts which do not operate with chain wheel or tray, such as grail or tripod. Push and pull the chain wheel and tray, looking the variation range of dial indicator pointer. If variation range is less than 0.001, the chain wheel has excellent precision. If the variation is located between 0.01mm and 0.03mm, the chain wheel has good precision. When the variation range is larger than 0.05nn, the chain wheel has poor precision. Then, it is difficult to adjust circular degree of cylinder bellowing 0.05mm. Firstly, recover the precision. The methods depend on operating structure and ways of chain wheel.

1.2 Rough surface between wheel chain and cylinder or dial and bracket
When the surface is rough, the gap between cylinder, dial, chain wheel and bracket compress, after being strained or fixed by fastening screws, which may result in elastic deformation occurring on cylinder and dial. So circular degree changes, exceeding required scope. In actual operation, if loosen fastening screws and turn wheel chain slowly, circular degree can adjust to below 0.05mm easily. However, check circular degree after fastening screws, the precision is larger than 0.05mm. The followings are the procedures for resolution:
a.Loosen fastening screws. Then regulate the cylinder and dial to lower than 0.03mm.
b.Loosen header of dial indicator and put the header on end face of cylinder or dial. Rotate screws to downward pointed by header, fastening screws and looking header changing. If readings decline, gap exists between cylinder and dial or chain wheel and bracket.
c.When header changes, put proper spacers at two sides of fastening screws, tightening screws and observing header. Regulate the header until variation less than 0.01mm. Non variation is the best. Repeat the same procedures on the next screws. Tighten every screw so header is less than 0.01 mm. Then, there is no gap existing between cylinder and dial or chain wheel and bracket. What needs to noticed is that loosen the screw after regulation having been finished, ensuring that cylinder and dial keep relaxed during regulation.
d.Check the flatness of cylinder and dial. When header is larger than 0.05mm, put the spacer and regulate to lower than 0.05. Then, fasten the screws.
e.Loosen the header of dial indicator and put it at side of cylinder or handicap of dial. Regulate circular degree of cylinder and dial to less than 0.05mm, fastening the screws.
1.3 Circular degree cannot reach to precision due to flaws on cylinder
Judging flaws on cylinder is quite simple. Carry out the procedures on 1.1 and 1.2 to eliminate interference factors on wheel chain and bracket. Regulate the dial and cylinder. If circular degree is still larger than 0.05, record the degree of every spot on cylinder and dial in details. Analyze those data. If difference of degree between two spots on cylinder or dial is lower than 0.02 while the whole circular degree is larger than 0.05mm, the shape of cylinder can be judged as oval. It can be concluded that flaws exist on cylinder or dial. If the whole circular degree is quite closed while partial degree exceed standard, the degree not change after loosening screws, it can be judged that cylinder and dial have deviation for degree not changing. It is flaws.
2.Circular degree regulation
After flatness regulation being finished, stand of dial indicator is remained on cylinder. Header points to the contact surface between located block on bracket and tray. When adjust left and right of tray, the tray moves depending on the end face. If upright has impacts on dial indicator, change the dial indicator and adjust again. Firstly, loosen the located block and separate it from tray. Turn the machine until circular degree reaches to standard scope. The followings should be focused.
a.When circular of tray over size, just regulate the position of opposite located blocks so that reading can be lower than 0.03mm. Because tray has limitation for adjustment range which can ensure that deviation of opposite located blocks below than 0.03mm on turning radius. When tray rotates within small range, the position of located blocks can be remained.
b.When adjusting circular degree, tray cannot be peaked to the required position by using located block. Although reading is correct, elastic deformation has occurred on tray. It not only influences flatness of tray, but also influences circular degree when regulating tray. The right method is that read the reading after external force having been eliminated, whatever methods used. Regulate to the required rang, then, lock the located blocks.
3.Circular degree and flatness of double circular knitting machine regulation
When circular degree and flatness exceed normal range, firstly, make sure that bearings inside sleeve and chain wheel have no loosened quantity or loosened quantity is allowed. Then regulate the machine following the procedures.
3.1 Same circular degree
Install dial indicator as requirements then loosen all of fastening screws. Rotate dial indicator to foot, and tighten fastening screws one by one. Look at dial indicator variation to confirm the position of space. Put spacer inside space. When a screw has been regulated, loosen the screw and carry out regulation on the next screw. The reading variation is lower than 0.01mm until all of screws have been tightened. Rotate the knitting machine to see if levelness has exceeded normal range or not. If levelness exceeds normal range, use spacer for adjustment.
3.2 Same circular degree
Install dial indicator as requirements. Operate the knitting machine to see if circular degree has ever exceeded normal range or not. If circular degree has exceeded normal range, use adjusting screws on machine to regulate to range. What should be noticed is that using adjusting screws is the same as located block. The adjusting screws cannot be used to peak the sleeve. Otherwise, elastic deformation may occur on parts. Use adjusting screw to move sleeve to required position. Then loosen adjusting screws and read the readings again.
When adjust circular degree, six opposite points can be chosen as bases, because wheel chain on some machine cannot be loosened. The motion trail of wheel chain shows ellipse due to abrasion. Center of a circle is not fixed. Just only regulate interpolation to normal range. However, if motion trial of wheel chain shows ellipse due to deformation, the deformation should be eliminated at first so that motion trail can be recover to circle. Similarly, if flatness exceeds normal range in some positions, it can be judged to be caused by wheel chain abrasion or deformation. If it is caused by wheel chain, the deformation should be eliminated firstly. When it is caused by abrasion, finishing or replacement should be based on severity.
